Sunday, August 18, 2013

Sunday, July 7, 2013
Challenges
"Card Challenge" is my topic of the day. The definition of challenge: to arouse or stimulate especially by presenting with difficulties.
What is a challenge? How do I play?
"A challenge is simply an invitation to make a card! The “catch” is that your card must follow certain “rules”….the rules are outlined within each challenge. For example, in the Try a New Technique Challenge, your card must use the particular technique that was posted. Each challenge is not a race to see who can make one first, nor it is a contest to see who makes the “best” card! It is really fun to see all the different ways stampers can make radically different cards that still fall within the parameters of the challenges. Challenges are a great way to actually get stampin', and often helps us grow and stretch beyond our normal stamping comfort zones." - www.splitcoaststampers.com
I enjoy participating in challenges. It really does make you dig deep and come up with a design you like....and sometimes may not like. I like to take a focal point, whether it's a stamp set, paper color or a technique and work my challenge around it. Easy at times and not so easy at other times ... but it is challenging nonetheless.

My blog challenge is going to cover two different challenges. One is the Mojo Monday (shown on the left) and the second is Splitcoaststamper WT434 Flower Trivia challenge with no restrictions except that you have to use the flower of your state. Here is the link for the state flowers. http://en.wikipedia.org/wiki/List_of_U.S._state_flowers
Maine's state flower is the white pine cone and tassel. I used Stampin' Up!
Watercolor Winter stamp set and Sassy Salutations stamp set for the sentiment.
It's hard to see the layout, but it is as follows:
Stampin' Up! Whisper White card base, Soft Suede is the next layer, a dark green strip is off center, followed by tan with the boughs and pine cones stamped on it. I used the 2-3/8 scallop punch (SU) and punched two scallops, tan and green. Layered them and stamped the sentiment on the tan as well as some pine cones. I cut two pine cones out that I had stamped on extra paper and adhered them with SU dimensionals. I added a red 1/8 inch red ribbon bow. This could actually be used a Christmas card and just change the sentiment.
I hope you like it! I enjoyed creating it. :)
Enjoy!
What is a challenge? How do I play?
"A challenge is simply an invitation to make a card! The “catch” is that your card must follow certain “rules”….the rules are outlined within each challenge. For example, in the Try a New Technique Challenge, your card must use the particular technique that was posted. Each challenge is not a race to see who can make one first, nor it is a contest to see who makes the “best” card! It is really fun to see all the different ways stampers can make radically different cards that still fall within the parameters of the challenges. Challenges are a great way to actually get stampin', and often helps us grow and stretch beyond our normal stamping comfort zones." - www.splitcoaststampers.com
I enjoy participating in challenges. It really does make you dig deep and come up with a design you like....and sometimes may not like. I like to take a focal point, whether it's a stamp set, paper color or a technique and work my challenge around it. Easy at times and not so easy at other times ... but it is challenging nonetheless.

My blog challenge is going to cover two different challenges. One is the Mojo Monday (shown on the left) and the second is Splitcoaststamper WT434 Flower Trivia challenge with no restrictions except that you have to use the flower of your state. Here is the link for the state flowers. http://en.wikipedia.org/wiki/List_of_U.S._state_flowers
Maine's state flower is the white pine cone and tassel. I used Stampin' Up!
Watercolor Winter stamp set and Sassy Salutations stamp set for the sentiment.
 |
| Mojo Monday 300 and TW434 |
Stampin' Up! Whisper White card base, Soft Suede is the next layer, a dark green strip is off center, followed by tan with the boughs and pine cones stamped on it. I used the 2-3/8 scallop punch (SU) and punched two scallops, tan and green. Layered them and stamped the sentiment on the tan as well as some pine cones. I cut two pine cones out that I had stamped on extra paper and adhered them with SU dimensionals. I added a red 1/8 inch red ribbon bow. This could actually be used a Christmas card and just change the sentiment.
I hope you like it! I enjoyed creating it. :)
Enjoy!
Sunday, June 23, 2013
Card Quilting

This "quilted" card was inspired by the wall hanging I made with my daughter at a sewing class together (below). We had such fun!
Have fun with this card. Use any papers and colors you like.
The measurements can be changed up. You don't have to be too exact. However, it is important to make sure the base of the quilted card (tan in my case) is square, if not, your design will be crooked. My tan square base measures 4 x 3-14/16.
I chose the square size I liked and then went from there, so the overall size may vary. I find if you use just a small amount of adhesive tape on the back of each quilted piece, you can lay it down and rearrange them without too much difficulty. Once you have it the way you like, finish adhering it. I put the border trim on last, just as you would when sewing a quilt.

For this card I cut seven 1 inch squares out of a solid-ish red DSP. Five are left whole and two are cut in half, giving you triangles. I always cut more ... Just in case! :)
I cut three 1/4 inch strips of red flowered (border) DSP. A piece of tan card stock 4 x 3-14/16.
I started by placing the whole red squares in each corner, leaving a small area (approximately 1/4") around the edges (for the trim). Then I placed the triangle red squares in next. I placed a whole red square in the center space.
I measured the space between the center square and the other solid squares to cut the trim that goes around the center block . It should be 1/4 inch, ... but, measure twice, cut once. Or so that's what Bob (husband) says when building anything. Adhered the four small strips. I cut a small block out of the flowered DSP for the very center of the block. I then measured, cut and adhered the outside border trim.
I made the quilting effect by using an ultra thin black ink crafting pen and added the dotted lines. Voila, you are now done with your quilt. Next, I adhered the quilt to red card stock and then to the white card base. I stamped my "Thank You" in Whisper White on the bottom of the Real Red paper and added a paper rose made with the same flowered DSP matching the quilt.
Supplies:
Paper: Stampin' Up! (SU) Whisper White, Real Red, Crumb Cake, DSP Any style you like. I used a retired style
Ink: Whisper White craft pad
Stamp: Sassy Salutations "Thank You"
Other: Glue Dot, Ultra thin Black (005) ink pen
The paper rose is very easy to make. Visit Tania Gould's link at http://taniagould.blogspot.com/2010/07/rolled-rose-tutorial.html She shows you how easy it is. Rather cutting the spiral neatly, I chose to tear the paper. Give it a try! Thanks Tania!
I hope you all enjoy this ... and Go Create! Share with me, I would love to see!
Enjoy and Happy Stamping!
Enjoy and Happy Stamping!
Thursday, June 20, 2013
Rumble Time
 It's a challenge .... Wahoo .... Ready, Set, GO! PPA 161 Challenge using squares, diagonals, and a circle ... Makes me think of the Wizard of Oz tune, "lions, tigers and bears, oh my!"
I certainly need to work on my photography skills, see the corner of the cutting board? lol I need to create an area that will be the right height and lighting. Gotta research it - sounds like that's what I'll be doing on the weekend! I would appreciate any ideas ya'll may have. I would love to hear from you.
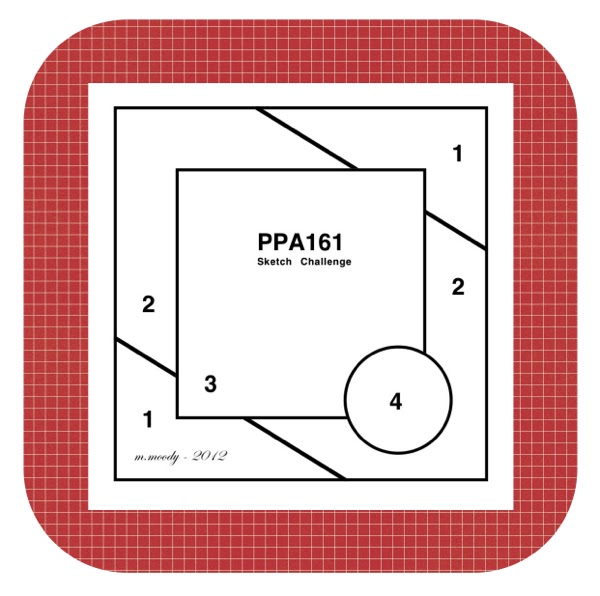 This is the PPA 161 sketch design. This card is made using a base that measures 5 X5 folded. I cut the triangles and the diagonal from Midnight Muse and DSP. I made the flower, using Midnight Muse ink to color up the front and back of petals, curled and adhered together using glue dots and then used a dimensional to make it pop. I added the pearls to give it a little elegance. The supplies I used are listed below.
Paper: Whisper White, Midnight Muse, and a sheet of the DSP pack in
color (#12028)
Punches: Blossom Party die, Boho Blossoms, and a circle punch
Stamps: Petite Pairs
Odds & Ends: Glue Dots, Dimensional, Pearls, Adhesives
Enjoy and Happy Stamping!
Wednesday, June 19, 2013
 Tonight was a night for catching up on a couple of thank you cards. I made the same design, but used different colors. Pretty?
I used the coordinating inks to the papers. I used SU old olive for the base of the card, whisper white for the background and for the inside of each card. I created one card with pool party paper and ink, one with raspberry ripple and ink, one with primrose paper ink and the last one in cajun craze
and ink. And all on shimmer white paper. The stamps I used are SU Summer Silhouettes for the small flowers on the inside of the cards. The thank you from SU Made for You, and a single flower stamp, Boutique Blossom. I tied a small ribbon and attached with a glue dot.
Now aren't these pretty! I hope the receiver like them! It would make a great set to give away.
Enjoy and as always,
Happy Stamping!
Tuesday, June 18, 2013
Seaglass
I would love to say I've been on vacation in Hawaii (with no access to electronics) and that is why I have not posted since April .... but I guess, I will use the usual reply ... I've been super busy. But honestly, the Hawaii excuse is much more exciting!
I made this card for a challenge in the CardMaker magazine. Thanks to Lindsay & Bobby for the magazine! It's fabby and full of lots of creative works of art. We had to design a beach themed card using blues, tans and orange.
This card is made using a technique that Connie Stewart http://youtu.be/JVjU56MIs04 uses. Rather than using glossy paper, I used a shimmer paper. It simulates how the water sparkles at night. The stamp set is from Fiskers. The inks and paper used are from Stampin Up! The sea glass is from Maine beaches. This was a fun, fun card.
Happy Stamping!
 |
| Seaglass - Big Island, Hawaii 2013
|
I made this card for a challenge in the CardMaker magazine. Thanks to Lindsay & Bobby for the magazine! It's fabby and full of lots of creative works of art. We had to design a beach themed card using blues, tans and orange.
This card is made using a technique that Connie Stewart http://youtu.be/JVjU56MIs04 uses. Rather than using glossy paper, I used a shimmer paper. It simulates how the water sparkles at night. The stamp set is from Fiskers. The inks and paper used are from Stampin Up! The sea glass is from Maine beaches. This was a fun, fun card.
Happy Stamping!
Sunday, April 21, 2013

 Oh, what to have for supper. Wandering through the grocery store isles .. looking at this and that. Just how much cooking do I really want to do today I asked myself. No very much, I said. In that case I always head to the pasta isle. It's very easy to make. Just buy a cooked chicken and cut it up. Cook a box of penne, drain and set aside. Cut up peppers, onions and mushrooms and saute until soft. Add in chicken and the cook noodles and one jar (more if you like it moister) mix together and keeping heating on the stove top until heated through. Sprinkle the top with mozzarella cheese and put in oven at 400 for 10-15 minutes until melted. YUM! The spices I used were salt, pepper, red pepper, garlic powder and italian seasoning. I topped it with some chopped chives from the garden. Can you believe I have chives growing already. Just had to have something green on the top...makes it pretty and complete.
Enjoy!
Thursday, April 18, 2013
Butterflies
 Spring has sprung ... I think, well, maybe.... I know you can't tell too much from the picture, but this card has a light yellow pattern for the back ground and a couple of the butterflies are in yellow polka dots... Now when was the last time you saw a polka dotted butterfly? I must say, I did see a butterfly this week which is a bit odd, but maybe spring is finally here.
 Enjoy!
Happy Crafting :)
Wednesday, April 17, 2013
Thinking of You
 Thinking of you today, tomorrow and everyday. This week has been a difficult one for all. Laughing one moment, crying the next. Please Lord watch over us and keep us safe. Walk along side those whose lives have changed in a moment and give them strength where there is no strength.
My thoughts and prayers go out to the people and families of the injured and killed in the Boston bombings.
God Bless.
This card is made with the following Stampin' Up! products:
- Thoughts and Prayers stamp set, Primrose Petals Ink
- Big Shot Elegant Bouquet folder
- Blossom Party die set for the flowers
- Pretty in Pink paper and Primrose Petals ink to color the petals.
- Whisper White paper for the base of the card
- Brad - More Mustard
- Organza Ribbon, Whisper White
Monday, April 15, 2013
What a beautiful day! The sun is out; it's warm. Took Miss Jasmine for a walk...She loved it! Maybe spring has finally sprung? (fingers crossed) Snow has melted, well almost. There are still spots around the yard that are too stubborn to melt. Soon though.
My version is a storefront java shop. I used the Morning Cup stamp set from Stampin' Up along with whisper white, real red, and red polka dots paper. It is three dimensional ... Coffee, tea anyone?
I cased this card from Connie Stewart. She has some great ideas! http://pinterest.com/pin/104779128802263462/
Enjoy!
My version is a storefront java shop. I used the Morning Cup stamp set from Stampin' Up along with whisper white, real red, and red polka dots paper. It is three dimensional ... Coffee, tea anyone?
 |
| Java Shoppe |
I cased this card from Connie Stewart. She has some great ideas! http://pinterest.com/pin/104779128802263462/
Enjoy!
Sunday, April 14, 2013
Blog Newbie!
Embedding a video has been challenging! I'm determined to accomplish this even if it takes my whole four-day weekend! Finally... By George, I think I've got it! Below is a YouTube video from Linda Bauwin, Creative Folds Series. I think Linda is so creative. So I had to case her card. Below is my design. I thought I would make a spring card.
Between using a laptop (which I don't generally use) and designing this blog...my patience have been tried. I'm not very techy, but I'm learning and once I've accomplished it...yahoo! I keep hitting unknown buttons on the laptop while I'm typing and before I know it, I've changed a setting. No "undo" button... you would think that would be a mandatory button in all blog format windows! haha! I do need to work on my photographic skills and lighting...but all in good time.
I used the stamps sets For the Birds and Summer Silhouettes for the little flowers on the inside of the card. For paper colors, I used Pretty in Pink, Whisper White and Island Indigo. I used the square lattice folder for the imprint on the card. I stamped the designs using black StazOn ink and colored them in with different water-colored pencils and used a blender pen to fill in. I used added sparkle to the flowers and bird using Dazzling Details.
Here is Linda's card and her video show you how to make it. Fun, fun, fun!
Between using a laptop (which I don't generally use) and designing this blog...my patience have been tried. I'm not very techy, but I'm learning and once I've accomplished it...yahoo! I keep hitting unknown buttons on the laptop while I'm typing and before I know it, I've changed a setting. No "undo" button... you would think that would be a mandatory button in all blog format windows! haha! I do need to work on my photographic skills and lighting...but all in good time.
 | |||
| Spring Card |
Here is Linda's card and her video show you how to make it. Fun, fun, fun!
Thursday, April 11, 2013
Ahhh ... Thursday, it's been a very busy week. I have a four day weekend coming . Yahoo! Tax time is looming overhead. Oh my, I know what I'll be doing on Friday. Well, hopefully just in the morning, leaving the afternoon to play!
Isn't this cute! I made this card for my son and future daughter-in-law! I'm using it as a thank you card for the birthday presents they gave to me.
I used the StampinUp (SU) stamp set Petite Pairs (#122497). I was going to attach a picture of the stamp set ... but I seem to be having difficulties...oh well. I used whisper white for the base and sponged pool party ink around the edges. I used early espresso for the first layer then used a sheet from the antique boutique paper set. I used a yellow ribbon and tied it in the middle. I used the 2 3/8 scallop punch and pool party paper, then whisper white and the 1 3/4 circle punch and lastly the 1 1/2 circle punch with daffodil yellow paper for the flower. I used the "so many smiles" stamp to stamp the center of the flower. Voila ... what a cute fun card!
Catch ya all on the flip side!
Happy Craftin!
 |
| So Many Smiles
|
I used the StampinUp (SU) stamp set Petite Pairs (#122497). I was going to attach a picture of the stamp set ... but I seem to be having difficulties...oh well. I used whisper white for the base and sponged pool party ink around the edges. I used early espresso for the first layer then used a sheet from the antique boutique paper set. I used a yellow ribbon and tied it in the middle. I used the 2 3/8 scallop punch and pool party paper, then whisper white and the 1 3/4 circle punch and lastly the 1 1/2 circle punch with daffodil yellow paper for the flower. I used the "so many smiles" stamp to stamp the center of the flower. Voila ... what a cute fun card!
Catch ya all on the flip side!
Happy Craftin!
Wednesday, April 10, 2013
Birthdays
Birthdays and blogs ... both start with B and both can be challenging...especially after you pass the 50 something mark! I spent a good part of a day maneuvering around the site and attempting to edit different areas and attach pictures. That was a bit frustrating at times, but I think I finally have a good beginning, although I'm still working out the bugs.

I created this card using the StampinUp stamp set, "Henry Says" (#128093)

- Base: 5-1/2 x 4 1/4 Whisper White (#100730)
- 5 1/4 x 4 Night of Navy (#100867)
- 5 x 3 3/4 Blue Stripes (Item #121028)
- 5 x 1 3/4 Night of Navy for the curtain
- 5 x 1/8 Blue Stripes trim on curtain
- 1 1/2" Oval punch (#119855) in Whisper White
- 1 3/4" Scalloped oval punch (#119856) in Cherry Cobbler (#119685)
- Typeset Alphabet Bigz (#127553)
I think this is a very cute and versatile set. It can be used for birthday party favors, cupcake toppers, gift bags, baby showers and more. The typeset alphabet bigz is fabulous! It comes with the numbers and the alphabet. I know I will get alot of use out of them!
Hope you enjoy and happy craftin!
Tuesday, April 9, 2013
April 9, 2013
Hi everyone! Welcome to Jean's Jazz.
I'm entering the world of blogging ...I know, I'm a bit behind in the times, but watch out, here I come! I hope you all enjoy my site. I'm hoping to have a lot of items posted here on the site ... that is if electronics and I have a "healthy" working relationship. :) I will have different creative projects and cards to view and make. I hope to be able to post something each day.
I love being creative making cards, baskets, quilts ... you name it. Handmade gifts are a unique way to say how much you care about someone. The gift of a handmade card speaks volumes. After all, anyone can pick up a store bought card ... hot of the printing press...the first card looking identical to the last 100,000 printed. But a handmade card or gift ... ah, now that is special. It's one of a kind -- no two are ever alike--just like snowflakes. I hope you enjoy a few of mine.
 |
| A Smore's Christmas |
 |
| Love Quilts |
 |
| Polka Dot Easter Basket
I look forward to talking with you all and hope you will enjoy my blog. This will be a site in progress, so please bear with me. I am working on improving my photography abilities. Helpful hints and "gentle" criticism is welcome.
Happy Crafting!
|
Subscribe to:
Posts (Atom)